Android studio предоставляет набор стандартных компонентов, таких как TextView, LinearLayout и пр. Но довольно часто приходится оперировать группами таких базовых компонентов при создании интерфейса. К примеру, текстовый ввод часто сопровождается текстовой меткой поля, получается комбинация TextView + TextEdit.
При динамическом создании таких групп, состоящих из базовых компонентов, вы раз за разом настраиваете какие то аттрибуты, погрязая в своеобразной рутине.
Один из подходов к оптимизации этой рутины — это создание классов-компонентов.
Он заключается в следующих операциях:
- Создание xml layout компонента;
- Создание класса компонента наследуя, к примеру, LinearLayout;
- Использование нового компонента.
Давайте рассмотрим реальный пример компонента, который я создавал для android приложения на kotlin.
Задача компонента состояла в отображении информации о физической активности. А именно, нужно было показать:
- иконку физического упражнения,
- название упражнения,
- статистику,
- общий результат.
XML Layout
Начинать удобно с создания XML layout. Для этого добавьте в проект в ветке res ->layout новый XML -> layout файл.
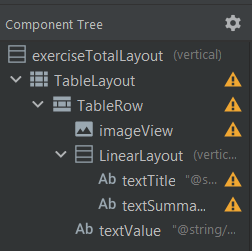
В моём случае получился макет следующего вида:


Или вот такой xml-файл:
|
1 2 3 4 5 6 7 8 9 10 11 12 13 14 15 16 17 18 19 20 21 22 23 24 25 26 27 28 29 30 31 32 33 34 35 36 37 38 39 40 41 42 43 44 45 46 47 48 49 50 51 52 53 54 55 56 57 58 59 60 61 62 63 64 65 66 67 68 |
<?xml version="1.0" encoding="utf-8"?> <LinearLayout xmlns:android="http://schemas.android.com/apk/res/android" xmlns:app="http://schemas.android.com/apk/res-auto" xmlns:tools="http://schemas.android.com/tools" android:id="@+id/exerciseTotalLayout" android:layout_width="match_parent" android:layout_height="wrap_content" android:layout_marginTop="10dp" android:layout_marginBottom="10dp" android:orientation="vertical"> <TableLayout android:layout_width="match_parent" android:layout_height="wrap_content" android:layout_weight="1"> <TableRow android:layout_width="match_parent" android:layout_height="wrap_content"> <ImageView android:id="@+id/imageView" android:layout_width="40dp" android:layout_height="40dp" tools:srcCompat="@tools:sample/avatars" /> <LinearLayout android:layout_width="match_parent" android:layout_height="wrap_content" android:layout_weight="2" android:orientation="vertical"> <TextView android:id="@+id/textTitle" android:layout_width="wrap_content" android:layout_height="wrap_content" android:layout_marginLeft="10dp" android:layout_marginTop="5dp" android:text="@string/text_sample" android:textColor="@color/textColor" android:textSize="16sp" /> <TextView android:id="@+id/textSummary" android:layout_width="wrap_content" android:layout_height="wrap_content" android:layout_marginLeft="10dp" android:layout_marginTop="5dp" android:text="@string/text_sample" android:textColor="@color/textColor" /> </LinearLayout> <TextView android:id="@+id/textValue" android:layout_width="wrap_content" android:layout_height="wrap_content" android:layout_gravity="center_vertical" android:text="@string/text_sample" android:textAlignment="viewEnd" android:textColor="@color/textColor" android:textSize="18sp" /> </TableRow> </TableLayout> </LinearLayout> |
Как видите, компонент состоит из нескольких базовых. Для управления понадобится класс, производный от LinearLayout.
Создание класса
Добавьте в проект новый класс и в коде наследуйте его от LinearLayout. Базово это выглядит следующим образом:
|
1 2 3 4 5 6 7 8 9 10 11 12 13 |
class DayTotalComponent @JvmOverloads constructor( context: Context, attrs: AttributeSet? = null, defStyle: Int = 0, defStyleRes: Int = 0 ) : LinearLayout(context, attrs, defStyle, defStyleRes) { init { LayoutInflater.from(context) // здесь мы подключаем XML layout файл .inflate(R.layout.exersize_total, this, true) orientation = VERTICAL } } |
Обычно такие классы еще дополняются методами, позволяющими управлять состоянием компонента извне. Как иллюстрация:
|
1 2 3 4 5 6 7 8 9 10 11 12 13 14 15 16 17 18 19 20 21 22 23 24 25 26 27 28 29 |
class DayTotalComponent @JvmOverloads constructor( context: Context, attrs: AttributeSet? = null, defStyle: Int = 0, defStyleRes: Int = 0 ) : LinearLayout(context, attrs, defStyle, defStyleRes) { init { LayoutInflater.from(context) .inflate(R.layout.exersize_total, this, true) orientation = VERTICAL } fun setExerciseLabel(text: String) { val label = findViewById<TextView>(R.id.textTitle) label.text = text } fun setSummary(text: String) { val label = findViewById<TextView>(R.id.textSummary) label.text = text } fun setValue(value: Double, type: DimensionType) { val view = findViewById<TextView>(R.id.textValue) view.text = StatusRec.formatValue(value, type) } fun setIcon(iconID: Int) { val exerciseIcon = findViewById<ImageView>(R.id.imageView) exerciseIcon.setImageResource(iconID) } } |
Четыре метода реализуют настройку 4х дочерних компонентов.
Использование созданного компонента
Компонент готов к использованию. Вы можете динамически создавать экземпляры реализованного класса и добавлять его в контейнеры компонентов.
Пример кода:
|
1 2 3 4 5 6 7 8 9 |
// создаём компонент val dayTotalComponent = DayTotalComponent(this).apply { // выполняем инициализацию свойств setIcon(getDrawableIdByName(exerciseType.imageName)) ... } // добавляем компонент в существующий layout val layout = findViewById<LinearLayout>(R.id.dayTeaserLayout) layout?.addView(dayTotalComponent) |